Looking for sewing projects for young sewists can be daunting. It’s not so hard to find them, it’s the sorting through that makes it rough. Trust me when I say all you have to do is google Sewing projects for kids to see how many sites pop up. Something else I want to add is that when I say young sewists, I am talking about two groups. First, young meaning actually young, youth, KID. Second, young meaning beginner, rookie, NEW. Whether it be your daughter (or son) who wants to sew something, or your friend who calls thread “string”, I believe all of these projects are wonderful for getting started with sewing. The best part is most of these can be done with your scraps!
I’m going to share one project each week for the next few weeks. This week I want to show you how to make bookmarks!

With another school year quickly coming to a close, these aren’t only a quick and easy project, they’re also wonderful teacher gifts! My daughter made these bookmarks for her teachers last year and then made some for a few friends. Everytime she’d bring one to a classmate, another classmate would request one. She ended up with a waiting list and worked diligently to get them made for each friend who asked for one. It was a great way to introduce her to sewing without a lot of stress and also sparked her creativity because I let her pick the fabric combinations and ribbon colors. She thought hard about each one so that it would be meaningful to the recipient.
The first thing you will need to do is gather up what you will need:
![IMG_1430[1]](https://figgfabric.wordpress.com/wp-content/uploads/2015/03/img_14301.jpg)
- The basics: Sewing Machine, scissors, all-purpose thread
- Fabric (2 small pieces about 4″ x 8″ in size. These can be 2 of the same print, coordinating, OR, use two completely different prints or colors to make it “reversible” as my daughter would say)
- Thread (any color, either coordinate to match fabric or use a contrasting color that will stand out)
- Light-weight batting (if you are a quilter, you probably have small scraps you can use. You will need one piece the size of your fabric pieces)
- Ribbon, about a 7-10″ piece (I used 7/8″ grosgain ribbon, but you can choose what works best for you)
- Cardstock to make your pattern
- Ruler to mark straight lines
- Point Turner
- Straight pins
- Lighter (if you are helping a little one, you will have to complete this step!)
![IMG_1384[1]](https://figgfabric.wordpress.com/wp-content/uploads/2015/03/img_13841-e1426122540924.jpg?w=236&h=236)
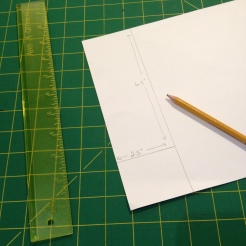 Now that you have everything gathered up, grab your piece of cardstock and decide what size you’d like your bookmark to be. We made ours 2.5″ x 6.5″ but you can make it any size you want. I wouldn’t suggest going any smaller because it gets a little tough to turn out. Use a ruler to draw your preferred measurements on the cardstock and cut it out using your non-fabric-cutting scissors.
Next cut out your batting using the pattern piece and set aside. Now use the pattern to cut your 2 fabric pieces. You can also stack all three pieces together, lay the pattern on top, pin and then cut out. My daughter preferred to do it this way but smaller hands may not be able to cut that many layers at once.

![IMG_1433[1]](https://figgfabric.wordpress.com/wp-content/uploads/2015/03/img_14331.jpg?w=234&h=234)
![IMG_1434[1]](https://figgfabric.wordpress.com/wp-content/uploads/2015/03/img_14341.jpg?w=235&h=235) Take one of your pieces of fabric and lay it right-side up. Lay your second piece of fabric right-side down on top of the first piece. Now, lay your batting on the top of both fabric pieces and pin together.
Take one of your pieces of fabric and lay it right-side up. Lay your second piece of fabric right-side down on top of the first piece. Now, lay your batting on the top of both fabric pieces and pin together.
Sew along the edge with a 3/8″ seam allowance or let the edge of the foot be your guide along the edge of the layers. Start on the top right edge, pivot at the bottom two corners, and then stop at the top left edge, leaving an un-sewn top edge.
Clip the bottom corners, then trim the sewn edges so it won’t be as bulky when you turn out.
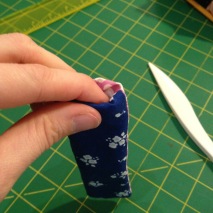
Turn right-side out so that the batting is now on the inside.

Use your point turner to push the corners to the right shape. Fold in the un-sewn edge.
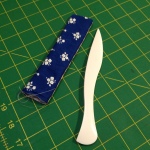
Take your piece of ribbon and fold in half, then tuck the folded edge into the open edge of the bookmark about 1/2-3/4″ down inside. Pin closed.


Sew along the pinned edge as close as you can. (Remember to take out your pins as you sew) Continue along the outer edge of all 4 sides. When you get back to the beginning you can either backstitch to secure it, or you can pivot again creating a maze pattern. Stop when you have no more room to go and backstitch to secure your stitching. This really helped my daughter to learn how to pivot at corners and reinforced stitching in a straight line, along with introducing her to quilting without her even knowing it!
Lastly, singe the edges of the ribbon so that they don’t frey with use. Be careful not to keep the flame too long in any one place or you will burn your ribbon, and maybe even your whole project! It may be important for you to know I always did this part for my daughter because I wasn’t comfortable with her using a lighter at her age.
ANDDDDD, that’s it! All done and ready to give out to a friend or tuck in your favorite book!


Good Job Maddie
LikeLike
I think this is a fabulous idea! Great job Maddie!
LikeLike